


DIY Film Holder for Developing 3x4 Sheet Film
or, How I Adapted A 35mm Film Tank to Hold This Forgotten Anniversary Speed Graphic Format
I have always had a habit of not doing things the easy way. For this reason I have been drawn to unusual items, including cameras. So, when a Speed Graphic fell into my lap, I could not help but have an interest in this out of style camera.
I obtained the camera for free in a trade for some other camera items. This Anniversary Speed Graphic looked clean enough, but had no lens or lens board. I was not particularly interested in this camera and just lugged it home while I concentrated on the other cameras n the lot. Sometime later I sat down and gave this camera a look. To my surprise, it was not a 4x5 Graphic, which I have owned in the past, but rather a smaller size.
I did some checking and relearned that Anniversary Speed Graphics were built in three different film sizes: 4x5 (So called even though the actual film size is slightly smaller.) A small 2x3 (So called even though the actual film size is apparently 2 1/4"x 3 1/4".) And 3x4 (Again so called even though I found out that the film sheet size is really 3 3/8"x 4 3/8".) This is the size of my specimen.
Online everyone fawned over the normal large 4x5 format Graphics, and also over the small 2x3 Graphic. No one however seemed the slightest bit interested in this middle "3x4" size. At that point I immediately decided I liked this camera. This article is not about the camera itself. I will address my trials to transform the camera into a near new "3x4" Anniversary Speed Graphic. I will not even cover the challenges of cutting sheet film to the correct dimensions ("3x4" film is not longer manufactured). The camera did turn out wonderful. Creating the correct size film was also resolved. Those topics will be addressed in differenct articles. Below I address only the problem of how to develop this sheet film size.
I tried without success to find existing equipment for developing this size film. Seemed like I was the only one in the world that had the slightest interest in actually shooting with this camera. In the Kansas City metropolitan area where I live, we have a very good business whose sole focus is developing film. People send their film from far and wide to have it developed here. The name of this business is call Process One in Overland Park, Kansas. I approached Dave, the owner with my problem. I have long been a customer. I do often develop my own film, but also it is quicker to have Dave do the work. He does process 4x5 film, but had nothing to hold this 3 3/8" x 4 3/8" film I needed developed. After a little convincing he jury-rigged a method to accomplish the task. But, what was required of me, was to trim the film, post exposure, so the lojng side dimension was slightly less than 4". This was the only way he could get at least one side of the film to fit into his developing tank. I did this, and the results were very good. However, because of the extra work needed on his part, which made the developing expensive, the extra film cutting required by me, and the fact that I was loosing a small amout of my negative on the long side, I decided to create some way of doing the developing myself.
I first purchased a Jobo 4x5 tank with a 2509n spool but found out that it would not adjust to my needed size. I though about modifying the 2509 spool but decided against this because of the extra developer required to fill this tank each time. I decide to give another developing tank I had a go. After some thought, a method was discovered.
The tank I used below for this modification was picked for two reasons. Other tanks that I checked seemed to have one obsticle or another that made the conversion harder. It is likely that this conversion could be accomplished with other make tanks and spools. This conversion however involves only this brand tank/spool combination.
The tank and contents I used were manufactured as an AP Universal 35mm developing tank. This brand tank can be found used on eBay, or purchased new from sellers like Adorama here: http://www.adorama.com/DKTPU.html
The great part of this conversion is that you do not permanitely change or damage the tank and one of the spools. The only modificaiton to this equipment is to one of the spools which after the modification can never be used again to develop 35mm or 120 film. Proceed with that understanding!
Here is an image of 4x5 sheet film alongside a sheet of factory "3x4" film to provide an idea of the relative size differences.

And here is an image of the AP Universal tank in question.

Same tank again with all pieces laid out.

Below is a breakdown look at one of the tanks reels. This reel is expandable from 35mm to 120. Note that when apart, the right side of the reel is sized to fit snuggly against the tank's center tube (See above photo). The left side is larger, to slide over the right side of the reel. What we require is to widen the reel to fit the 3 3/8" or short side of our sheet film. When the two sides of the reel are set wide enough apart to feed our sheet film, they are too far apart for the two sides of the adjustable reel to fit together. This results in the left side of the spool being loose on the tank's center tube. This is not acceptable to support our end result.

The modification needed it to make the left side of the reel (above) fit the tank's center tube snuggly. I accomplished this as seen below. The two sides of one reel were locked togather in the 120 size configuration. I then used a hack saw to cut the reel in two, right at the point where the smaller side of the reel enters the large side.
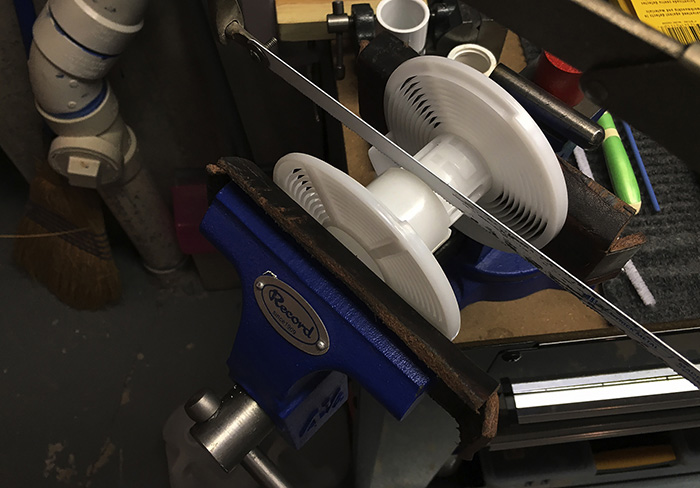
After filing and some sanding, the result is that the large side of the reel now has a portion of the small reel locked into its center. (Below) The result is a more snug fit when this modified side of the reel is placed over the tank's center tube.

We are now faced with how to keep the left side modified reel, away from the right side of the reel. This must be precise in order for the sheet film to slide onto the reel while still keeping it snuggly on the reel. I could have purchased a length 1" PVC pipe. it was only sold in 10' lengths, so for my purposes I bought a PVC 1" coupler that is designed to join to pieces of 1" PVC pipe together. I then sawed the coupler (Below) to a length just longer then that required to hold the two reel sides apart.


After filing and sanding, the spacer perfectly fit onto the tank's center tube and kept the two sides of the reel the correct distance apart.

The above correct size spacer was achieved after several trial loads of the sheet film into the reel and sanding a little more off each time. There is some bow that occurs to the sheet film, so the distances between the two sides of the reel are critical to ensure that the film does not come off during development. All this testing and test loading of film must be conducted with the left side of the reel, then the spacer, then the right side of the reel all held firmly onto the tank's center tube by the provided plastic clip. At the same time you must still hold the clip on firmly to ensure it does not slip and loosen the sides. This did occur several times and always caused the film to dislodge from the reel. Below shows the reel loaded with test film. Remember that as always when loading the actual exposed film onto the reel, you must be in complete darkness.

The modified reel with film loaded, sitting in the tank. The bow in the film did not cause film to touch the outside of the tank.

With the lid screwed onto the tank + stirring handle in place and ready to accept developing liquid. (Yes I know it got dirty during the modifications. I cleaned it up before using) Notice that the stirring handle is about even with the top of the tank.

Here is the tank with the water proof red lid in place. One of the things I learned is that the reel inside the tank still had some play and during inversion agitaiton the film sometimes came loose from the reel. I was able to stop this by holding my hand in the center of the red lid and pushing down when inverting. I believe that because the stirring handle come to the top of the tank. Holding down on the lid also pushes down on the reel inside. This seemed to keep the reel from moving up and down and so preventing the sheet film from coming loose.

Conclusions--
I used my two sacrificial pieces of sheet film and went through several complete cycles of developing, while using only water, to test the durability of this setup. I have now developed several sheets of this size film, and each time was successful. This includes developing reversal film. To this point I have only developed 2 sheets at a time. I am sure I could develop at least 4 at the same time but I have yet to try this.This brand tank is not likely the best out there. For example I always noticed that this tank leaks a small amount of liquid when inverting. None the less, it serves the purpose. After all, since I always seem to take the hardest route around, the effort here seems worth the effort.
One of the other benefits of this method is that the only piece in the kit that was permanently changed was one of two reels supplied with this brand tank. By using the left over unmodified reel sides together, you can still develop at least one roll of 35mm or 12omm film in this same tank when necessary.
I hope you enjoyed the article. I also hope
this helps the few others that must be out there trying to shoot this
interesting and unusual format.
Copyright: Bruce Varner 1972-2021